Costin Moga Postad 20 Februari , 2014 Författare Rapport Share Postad 20 Februari , 2014 Here you have a technical drawing of the seal mounting tool. scula simering Volvo 3D.pdf scula simering Volvo.pdf 2 Citera Länk till kommentar Dela på andra webbplatser More sharing options...
Costin Moga Postad 20 Februari , 2014 Författare Rapport Share Postad 20 Februari , 2014 LEAF SPRINGS Leaf springs were disasambled, cleaned and painted. First two blades were replaced (ALTYCO). These came complete with bronze bushes. I still regret not to have them sandblasted and powder coated. 1 Citera Länk till kommentar Dela på andra webbplatser More sharing options...
Beau Postad 20 Februari , 2014 Rapport Share Postad 20 Februari , 2014 I bought almost all the leafsprings from Altyco to replace the old tired ones. I remember that taking the springs off the Sugga and to put the new springs back again was a tricky job; to line up shackles with bushings so one could enter the bolts Citera Länk till kommentar Dela på andra webbplatser More sharing options...
Costin Moga Postad 21 Februari , 2014 Författare Rapport Share Postad 21 Februari , 2014 Altyco nolonger has all leaf springs on stock. I would have done exactly the same, but had to deal with only main ones (first and seccond). It is tricky operation, yes. 1 Citera Länk till kommentar Dela på andra webbplatser More sharing options...
Costin Moga Postad 21 Februari , 2014 Författare Rapport Share Postad 21 Februari , 2014 BRAKES Now this is important ! Get it right and it will be bulletproof. BRAKE DRUMS I had mines machined / rectified. On the other hand, ALTYCO stockes about 100 NOS pcs (!) - it might be better to purchase new if shipping costs are afordable.... BRAKE SHOES I had them cleaned and relined with new (modern) friction material. Bonded (glued) not riveted. HAND BRAKE Again, cleaned, relined. Riveted in this case. MASTER CYLINDER Rebuild, sleeved in stainless, new seals including dust seals, by PastParts UK (http://www.pastparts.co.uk/) Do not try this at home !!! Just send them the part as is, and be amazed what you'll get back ! WHEEL CYLINDERS Same by Pastparts UK My opinion is, although a costly operation, it is worth sleeving in stainless. This will give you sort of lifetime guarantee of the part, plus a trustworthy brake sistem. Other option is regular servicing. Not my cup of tea. I prefer do and forget. BRAKE HOSES New from ALTYCO. BRAKE LINES I used cunifer pipe (not copper) and homemade them all. New nipples (ebay). Flare tool (ebay). BRAKE FLUID DOT 5.1 - because it is hydrophobic. One think I thought of is mounting a remote servo. It seams easy to fit but I've no ideea of how much vacuum is needed and if engine provides enough. My guess it does. 1 Citera Länk till kommentar Dela på andra webbplatser More sharing options...
KristianEriksson Postad 21 Februari , 2014 Rapport Share Postad 21 Februari , 2014 As i said before, great work! Annoying thing with the front axle seal! Thought you did the wheel cylinders locally? Citera Länk till kommentar Dela på andra webbplatser More sharing options...
Costin Moga Postad 21 Februari , 2014 Författare Rapport Share Postad 21 Februari , 2014 I did them locally, but they leaked. Sleeve has to be 'glued' otherwise it will leak between the sleeve and the cylinder wall. There is a special machine to hone small diameters like wheel cylinders which I couldn't find locally. I marked: 'do not try this at home !' 1 Citera Länk till kommentar Dela på andra webbplatser More sharing options...
Costin Moga Postad 21 Februari , 2014 Författare Rapport Share Postad 21 Februari , 2014 RIMS / TYRES / CHASSIS PARTS Rims and all chassis parts, bits and pieces - all got sandblasted and painted. Tyres were rock hard and need replacement. My choice went to Michelin XZL 9.00 R16 which is a sort of equivalent to 9.00 16 (but not quite). These are actually 255 100 R16 meaning exactly 10.00 R16, thus an inch larger in width and 2 inches in diameter. These look fantastic on the vehicle ! And perform well too ! Especially in mud. Snow is ok, but I've seen better. Interesting feature is they weight 40 kg/pcs !!! Tubes are 2 kg/pcs ! I bought 4 pcs new from an ex-mod parts seller in UK (MOD=ministery of defence) but can't remember contact/link. If remember well cost was 130 euro/pcs + shipping. A bargain, one could say - remember to haggle when you buy from UK, especially when paying cash without receipt. It works. Unfortunatelly, these tyres do not have the Swedish Army 3 crowns labell . 3 Citera Länk till kommentar Dela på andra webbplatser More sharing options...
bsvensso Postad 21 Februari , 2014 Rapport Share Postad 21 Februari , 2014 Fantastic work, better then new! Citera Länk till kommentar Dela på andra webbplatser More sharing options...
Costin Moga Postad 21 Februari , 2014 Författare Rapport Share Postad 21 Februari , 2014 ENGINE First glimpse. Engine was a non-runner. Previous owner had a problem with a broken manifold. We all know this part is made of a very poor cast iron and is subject to rust. But it was turning and had oil in it. Through ALTYCO I managed to purchase a 'used but good' manifold, and, following a fast replacement, we fired up the engine !!! This is how it looked like when taken off the car. 1 Citera Länk till kommentar Dela på andra webbplatser More sharing options...
Costin Moga Postad 21 Februari , 2014 Författare Rapport Share Postad 21 Februari , 2014 ENGINE So, where to start to ? Obviously, brake apart, make a list of parts, logistics, repair, rebuild. It did not look very shiny at this point, though... Manifold. Solved. Broken engine rods roller bearing. made of unobtainble. Problem. Engine wear. To be honed and sleeved. Not in stainless, no... Piston rings - worn out. Not to be found. Dynamo. Missing. Was replaced by previous owner by an alternator. Water pump. Repaired at one time. Not with original parts, poor quality. To be overhauled. Conclusions - let's stay optimistic. We can do this ! Looks like the little man on the bottom of the oil bath is saluting us ! Have you noticed it ? 2 Citera Länk till kommentar Dela på andra webbplatser More sharing options...
Costin Moga Postad 21 Februari , 2014 Författare Rapport Share Postad 21 Februari , 2014 ENGINE Stripping & Cleaning Not much to comment on this operation. Stripping bit by bit, lots of photos. Cleaning with diesel and splash with water. And very fast sweep and dry as cast iron starts rusting in less than 30 min. 4 Citera Länk till kommentar Dela på andra webbplatser More sharing options...
Costin Moga Postad 21 Februari , 2014 Författare Rapport Share Postad 21 Februari , 2014 ENGINE SLEEVING Decision was swift: engine wear was significant, larger pistons (repair #1) were unavailable, therefore sleeving was needed in order to reuse original pistons. Something had to be done with the engine rod bearings and cranckshaft too. Until then - sleeving: Pistons were maked before taking them out and engine carried to the turner. He honed the engine block, inserted the cylnder sleeves, measured each piston, and acording to their size added 0.5mm to cylinder diameter. Better than new... Note the last image showing the side of the engine - you can see the cylinders which had a hole on one side. Now it's blocked by the cylinder sleeve. Our guess it is a technological hole, it had no use, beeing below bottom piston travel. Let me know if you have a different opinion. 4 Citera Länk till kommentar Dela på andra webbplatser More sharing options...
Costin Moga Postad 21 Februari , 2014 Författare Rapport Share Postad 21 Februari , 2014 ENGINE Engine rod bearings. This is how we ended up solving the unobtainable engine rod bearings. Remaking them. From new, larger diameter and thicker ones - from a Saviem truck. A aluminum cylinder had to be machined of the size of what the cranckshaft will be. Bearings were forced to fit in each half of the rod, then cut the excess length. Finally they were mounted inside the rod with the cylinder and bended again by tightening the two half sides of the rod. Cranckshaft had to be machined to exactly the same dimension for tight fit. Although I was skeptical about the result, the mechanic told me this was usual once in the days. It seams to be working. The old school mechanic is priceless !!! 2 Citera Länk till kommentar Dela på andra webbplatser More sharing options...
Wingflyer Postad 21 Februari , 2014 Rapport Share Postad 21 Februari , 2014 What an incedible thread! :wub: 1 Citera Länk till kommentar Dela på andra webbplatser More sharing options...
Costin Moga Postad 21 Februari , 2014 Författare Rapport Share Postad 21 Februari , 2014 ENGINE Valves and valve seats. Both were remachined to factory specifications. 1 Citera Länk till kommentar Dela på andra webbplatser More sharing options...
Costin Moga Postad 21 Februari , 2014 Författare Rapport Share Postad 21 Februari , 2014 ENGINE Piston rings These were also impossible to find. We had to order (ALTYCO and an old seller from UK) oversize - 0.20 (repair step one). Remember cylinders were impossible to find oversize. Well, rings were impossible to find not oversize !!! Fitting oversize rings is to be done by grinding their edges to get a certain dimension of the gap. Mounted and checked with light underneath. If no light passes, we're good to go. One ring (the fire ring if I remember well) was purchased from an old seller in UK who told me it was from a Bedford truck. If you were wondering where from 84.14 mm comes from (cylinder diameter), there you have the answer on the Pedrick rings package - 3 5/16 inch. 1 Citera Länk till kommentar Dela på andra webbplatser More sharing options...
Beau Postad 21 Februari , 2014 Rapport Share Postad 21 Februari , 2014 Very exciting story and pictures. Keep going! ^_^ Citera Länk till kommentar Dela på andra webbplatser More sharing options...
Costin Moga Postad 22 Februari , 2014 Författare Rapport Share Postad 22 Februari , 2014 ENGINE WATER PUMP Another difficult piece. Although it looks simple, it was a paint in the *** to rebuild. First, as I said before, it was rebuild at one time using another impeller, I believe from a LandRover. Very poor rebuild - the impeller was way much smaller, probably not pushing enough water through the engine and not cooling it. I ordered an original part from ALTYCO, but they only had one pcs 'used but good'. Well, that's what we get, that's what we have to use... But when mounting it, it broke (remember it has to be tight fit on the shaft). Old cast iron gets very breakable ! So we had to send the broken part to the turner and he made a new one from aluminum. Not only it will not rust, but it's much lighter too, therefore less momentum. We ordered him a new shaft as well. New bearing was installed. New water seal (ALTYCO). Have a look at last picture - we made the impeller slightly larger compared to original for a tighter fit to casing wall. Done. Use of the vehicle showed water pump is good, cooling the engine to 80 - 84 degrees max in hottest summer. Some leaks in first 800-1000 km by the water seal. Mechanic told it will leak untill the new surface on which the water seal presses will get smooth enough to seal the water. It's exactly what happened. Now - no leaks ! 4 Citera Länk till kommentar Dela på andra webbplatser More sharing options...
Costin Moga Postad 22 Februari , 2014 Författare Rapport Share Postad 22 Februari , 2014 ENGINE IGNITION I decided to switch to electronic ignition and replace the breaker points for more reliability and accuracy. Although the Sugga engine is low rev, the whole sistem gives trouble free usage. - it's maintenance free - accurate - more powerfull spark (combined with modern coil) - fits into original distributer Kit was purchased from here: http://www.hot-spark.com/ I'm using the original spark plugs - AC Delco 45 purchased from here: http://www.gsparkplug.com/shop/ New spark plug leads were installed too. In usage this upgrade prooved very reliable offerig a good start even at -12 C (coldest I tried). Set up was done using stroboscopic light. Pictures show distributer with braker poins and electronic ignition plus some details with codes for rotor and distributer. Also some measurements I made of the shaft. Some detailed cleaning was necessary on the distributer. I have only one concern regarding proper functioning of the ignition - I'm not sure the shaft conterweights springs are still calibrated corectly. They are the original ones. Sistem was cleaned for easy of movement, but I guess springs should be a little bit 'tired' after 50+ years. Anyway, car runs perfect (to what I can tell) and spark plugs are light grey as they should. 3 Citera Länk till kommentar Dela på andra webbplatser More sharing options...
Costin Moga Postad 23 Februari , 2014 Författare Rapport Share Postad 23 Februari , 2014 ENGINE FUEL PUMP Fuel pump was serviced and bolted on. I mounted a replaceable fuel filter before it and took out the original one. Car is now 1 kg less.... Originally, there were two fuel pipes from the tank to carburettor - main and 'reserve' (fitted lower in tank, nearer to bottom). I had them replaced with new ones of course, but coupled the fuel pump to the 'reserve' pipe therefore it would pump from lower in tank. Fitted a T piece a bush having a 0.4 mm hole in it after the fuel pump and before the carb. Point is to work as return pipe avoiding pressure to build in the carb and eventual overflow. This worked fine except for starting and stalling in one case. On my vehicle the exchange heater situated under the manifold and carb is custom made (probably the original rusted away). It was build by previous owner and lacks the original sistem which directs hot air from exhaust under the carb when engine is cold and ('automatically') to exhaust when engine is hot. It looks like an unreliable sistem to me (although I never experienced using it) due to probable clogging of the axle in the side bronze bushes. Maybe if often serviced it would have worked, but I doubt it's reliability. So I have one empty box under the carb. Heats strong enough to avoid iceing in winter, but a bit too much in summer, evaporating fuel from the Rochester when car stops (engine off). Next start will involve turning the engine to push fuel pump rod untill topping the carb. Not very nice. Seccondly, I experienced stalling at one time. I was in the mountains, in summer on a forest road climb. At 1000 meters above sea level, petrol evaporates at 50-60 degrees C. On that hot day it's exactly what happened, and a 'vapour stopper' formed in the pipe (probably nearby it's nearest segment to exhaust). I had to stop the car on an incline and it did not fire back untill I took off the fuel pipe and blew air in it (fuel filler cap open) untill it pushed the vapour stopper out. Then I filled the carb with the lever on the fuel pump and it fired instantly. Having experineced these I decided to replace the original part with an electric fuel pump. A FACET (carb-for designed) pump was fitted and powered through the key. When I turn on the key fuel is pumped in the carb. Pushing the button will then fire the car. Instantly. Even if the pump has its own filter, an easy replaceable one was installed. A MALPASSI regulator was installed after the pump before the carb. You'll notice in the pictures the seccond return pipe now not in use. I plan to install again the 0.4 mm hole T piece and reuse it just to make sure nothing will force the carb. FACET fuel pump and MALPASSI regulator were purchased on EBAY UK. I have a thought of rebuilding the original 'hot spot' sistem but manually activated from dash not by a spring and counterweight as original. What do you think ? 1 Citera Länk till kommentar Dela på andra webbplatser More sharing options...
Costin Moga Postad 23 Februari , 2014 Författare Rapport Share Postad 23 Februari , 2014 ENGINE CARBURETTOR Overhaul kit from ALTYCO, but found available at several dealers. Stripped and cleaned, new parts installed. As you can see depicted, we tried to do our best to minimise 'false' air getting into the body through the axle holes. Fitted on one side a teflon bush and on the other side a brass bush with a cap (plain bottom). I've heard pros and cons about Rochesters: Pros: - simple and reliable - good performance in inclines (due probably to level chamber splitted in two on both sides - my guess ) - some say fuel economic - hmmm , really ? Cons: - not very adjustable (few calibrating options) - it rapidly evaporates fuel when engine is stopped - has a sort of delayed action when gas pedal pressed I've found some had it replaced by a CARTER YF which seams a straight forward swap, which has only one con regarding possible stall on steep inclines. Does anyone know more about that ? 1 Citera Länk till kommentar Dela på andra webbplatser More sharing options...
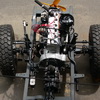
Costin Moga Postad 23 Februari , 2014 Författare Rapport Share Postad 23 Februari , 2014 ENGINE REBUILT 1 I'll let the images do the talking, not before urging you to notice timing chain is labelled 'Made in USA'. 1 Citera Länk till kommentar Dela på andra webbplatser More sharing options...
Costin Moga Postad 23 Februari , 2014 Författare Rapport Share Postad 23 Februari , 2014 ENGINE REBUILD 2 2 Citera Länk till kommentar Dela på andra webbplatser More sharing options...
Costin Moga Postad 23 Februari , 2014 Författare Rapport Share Postad 23 Februari , 2014 ENGINE REBUILD 3 5 Citera Länk till kommentar Dela på andra webbplatser More sharing options...

Rekommendera Poster
Join the conversation
You can post now and register later. If you have an account, sign in now to post with your account.