


l3314n
-
Innehålls Antal
16 -
Gick med
-
Besökte senast
-
Dagar Vunna
5
Om l3314n

l3314n's Achievements
Member (1/1)
27
Anseende bland gemenskapen
-
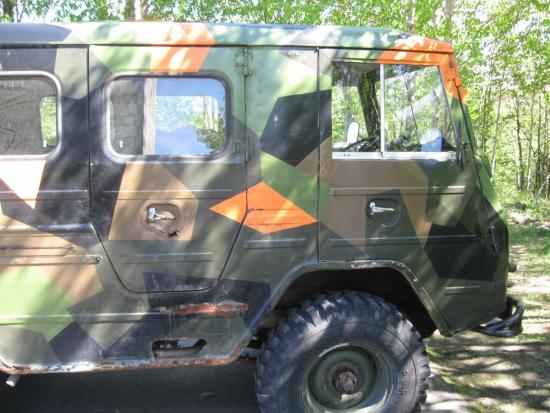
Regarding the alu-zinc, I do have some question What exactly is alu-zinc ? At olav-teigen, I was told that my version of the car was an hybrid of the Norwegian L3314, on which a Swedish top was installed, you can see a photo here: Is this a 'alu-zinc' top? It does not rust like the rest of the body, but there are definitely some small rusty patches in some areas. If it is, then obviously the doors are not, because it's rusting like mad. On this type of top, is it possible to add insulation (foam, or something like that) between the outside and inside sheets, and is it possible to replace some of the windows with sliding ones like I've seen on some online screenshots? Regarding the oil spray, that seems interesting, never heard of that before!
-
Halfsafe: Thanks for this information. Basically if we just repair the metal and put the usual green paint it's going to rust again soon? So, based on what you wrote, I understand it would make sense to: - have one of the usual valp repair places to replace the sheetmetal on the body side (the \_____(==)__/ shaped ones) using the available replacement parts - then bring the car to a real car paint specialist to get a real paint job (sanding out of the old paint, repair eventual holes, rust treatment, filler, and then real car paint with base and "cooked" paint) ? Guess that's going to be costly, but if it guarantees we don't have to do a never-ending fight against rust, that may be worth doing. And I guess the benefit would be that we would get some nice "normal" color, instead of the hunter camo pattern which makes everybody around look at us when we drive in town
-
Thanks for the answers: kristaga: Yes I understand written Norwegian, I still have problems with spoken Norwegian, but mostly because I do have audition problems - not only in Norwegian. I've been to olav-teigen already, they do not normally repair cars, but for things like replacing an engine top to run with unleaded fuel they sometime do it if their mechanic guy has time for it. I did not know that trollstein did repairs, I knew of them but was kind of put of by their website that seem to not be showing half of the pictures half of the time Thanks for the note about the cost, regarding Hof bilopphuggeri. Beau: The problem with #1 is that you can never really be sure about what you get. Our valp looked nice when we bought it, because it had been recently repainted... over the rust. The actual body problems appeared the next spring after a harsh winter that made all the rusty areas to pop from under the paint. At this point, we have a car that has a decent under carriage, a working engine that runs on unleaded fuel, new brakes, new exhaust, and the camper conversion inside (bed, solar panels, fridge, lights, ...) has been successful and is working fine. So I think it make more sense to continue on the base of what we have. Having the valp has never been about being economically rational, we do it just because it's fun, and if the price of repairs/fixes stays around 20000 nok per year, it's still cheaper than owning a real car in Norway. Hopefully if the body is correctly fixed and rust protected, we should be good for a number of years JDW: Not sure about what "plåt/ekonomiplåten" means, I guess "mek" is mechanics, so "plåte" would be "metal plates? metal sheet?". Vålberg looks close enough from Oslo to be worth investigating. Thanks!
-
Hi again. Now that we managed to do our road trip, I'm confident with the mechanical side of the Valp, but now the body need some serious work. We have the typical problems: - the bottom parts on the sides (where you put your foot to enter the door) are rusty to the point that the entire metal sheet need to be replaced - the body at the bottom front of the car is not straight (probably some old collision badly repaired) - the rear corners at the bottoms are also pierced with rust - the "tectyl" (asphalt/bitum) treatment under the car has to be redone - we have some bad rust points around the handles on two of the doors - there are rust holes around the windshield frame etc... we also want to get rid of the existing camo paintjob, because during summer it gets very very warm, so we would like to repaint cleanly the valp to some lighter color. and finally, we have a swedish aluzinc top on our norwegian bottom, but it's one without any window that can be open, so replacing one or two windows by sliding ones would be kind of awesome. So, imo, what's necessary is some sand/soda blasting to expose the metal, cut away the rusty parts and replace the metal sheet, then filler, rust treatment, good coating. The thing is, I'm living in an apartment, and I don't have access to any garage or workshop, plus I never actually did real bodywork: I don't know how to use a grinder, or mig welding, or how to get metal sheet straighted or how to put filler or even how to repaint with a spray (but I wish I could learn how to do that). Does any of you know where I could get this type of work done, how long it would take, and how much it would cost (ball park figure: Are we talking 100, 1000, 10000 or 100000 kroner?) My gf and I would also be totally ok in participating in the work, if only to learn how to do that! Thanks for any suggestion (and I can take photos of all the rusty parts I saw, if that can help in the assessment)
-
If you are interested, I wrote a blog article about the road trip around Norway and Sweden in the Valp: http://blog.defence-force.com/index?page=articles&ref=ART42
- 10 svar
-
- 1
-

-
Kjæresten min er norsk, men jeg er fransk og bor i norge. Hvis du kan forstår hva jeg skrive på norsk, vell, jeg kan prøve... men ingen garanti at jeg vill ikke shift til engelsk her og her fordi det er mange teknisk ord jeg kjenner ikke på norsk!
- 10 svar
-
- 2
-
-
Update: The car was fixed this morning, and we managed to reach back home (Oslo) earlier today Apparently the distributor cap was not the correct type for the car, and it was not a tight fit. With the vibrations it rotated and broke the connection between the "ruptor" and the "condensator". At 10am the garage had the ruptor thing fixed and the distributor cap replaced by the correct type. Pfiuu
- 10 svar
-
- 3
-
-
(First message was by my gf, sorry for switching back to english). So yesterday the guy from Vikking towing tried for two hours to get the engine starting, opened the distributor, tried to see if there was sparks, etc... he then gave up and took us back to Örebro but it was too late so the garage was closed. Hopefully today they will be able to take a look at the car and fix whatever problem there is. (I hope they can deal with a Valp though... specially a norwegian military 24v model) Kind of sad really, we had done more than 2500km since last week, without any problem, and we get it to break at less than 300km from home. Thanks for the answers so far!
-
Hei! Vi sitter litt fast i veikanten mellom Örebro og Karlskoga, ca 5 km utenfor Karlskoga. Mens vi kjørte begynte motoren å lage høye putre-lyder så vi kjørte inn på en liten sidevei og nå vil den ikke starte. Det kommer ingen gnist fra tennpluggene, og vi har ingen oljetrykk når vi forsøker å starte bilen, men startmotoren går fint. Akkurat nå venter vi på Viking, men det kan ta sin tid. De er visst veldig opptatte i dag. Er det noen som har noen ide til hva som kan være feil? Det er en B18 Valp / 1965. Ring oss gjerne +47 45 45 68 97 Takk
-
This week-end we have taken the car for a test drive, and tried the camper conversion (bed, etc...), so far it has worked well even if it needs some tweaks (improve the storage accessibility, rethink the water tank location). Today we are leaving for a two week trip going from Oslo to Kristiansund, then Trondheim, and back to Oslo through Sweden (Östersund, Mora, Karlstad, Oslo): Hopefully we will not have a breakdown on the road (else expect a depressed me posting a "please help" message ) In the mean time, I took the time to setup a blog with the detailed work we did on the car. I hope you will like it: http://l3314.no
-
remove engine for change with a B230ET
ämne svarade på l3314ns Leon_pp i Volvo Valp/Felt/C202/pvpjtgb 9031
What do you get with a new engine: purely more torque and acceleration or do you also get higher maximum speed? -
Looked awesome, but all the links are dead, all the pictures are missing :'(
-
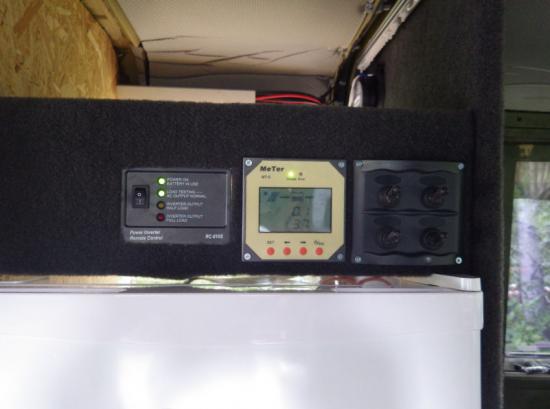
Two more photos. First the battery bank, charge controller, power-inverter, connection bar and fuse-box. It's located just behind the driver's seat, with a small hole protected with a rubber grommet to pass all the cables that goes to the front cabin. On top of the battery bank we have built a cabinet structure, which hosts the fridge, and over we have a board with all the control panels (inverter, charge controller, switches for the light, ...) which also acts as a small shelf where we can store stuff easily accessible from the front cabin. I've been taking photos of almost all the steps, mostly as documentation for my family, so if you want to see more details of the intermediate steps, just ask


-
Yes we do have a battery bank (two 140Ah batteries) connected to a charge controller and also a power inverter so we can use 220v appliance. Concerning the price and availability, that's the main problem! Basically there are a number of shops and individuals who have some stocks of these, and the trick is to find who have them and how to get them sent to Norway. I had few false starts on eBay, but I finally managed to get four from a seller on Amazon.com. They did not deliver out of the USA, so I had to use an extra service such as JetCarrier to get them sent to Norway, which of course increases the price. Each panel $179, but in total I paid about 6500 nok for the four panels, everything included (delivery + mva). You can definitely get more watts for less if you use standard panels, but they will weight a lot more and be less discreet and resistant to hail.
-
Ok, so here are few photos: The four panels rolled in their box: How it looks on the top. I was not very good at getting them extremely well positioned, the bonding glue is very strong, and if you misplace the panels they are almost impossible to move after. On the bonus side, the probability they fly when you drive is slim as well Side view, the panel is going down as low as the water evacuation gouge. You can see on the side the "velcro", which unfortunately was present on the model I ordered. If you can have the ones without velcro, you would get better results because we had to put some sicaflex on it, which was very messy. And finally, the cables are passing through holes in the back of the case, the panels are connected two by two to generate 24 volts level power, and in serial to get twice the power. Since they were installed we have driven about 200 km, they are just installed with the bonding glue and they are not moving. There's been rain and hail as well, they are still working fine, and they keep my batteries charged even with the crappy weather we have at the moment. So far, so good


