tcfengineering
-
Innehålls Antal
36 -
Gick med
-
Besökte senast
-
Dagar Vunna
7


tcfengineering's Achievements
Member (1/1)
111
Anseende bland gemenskapen
-
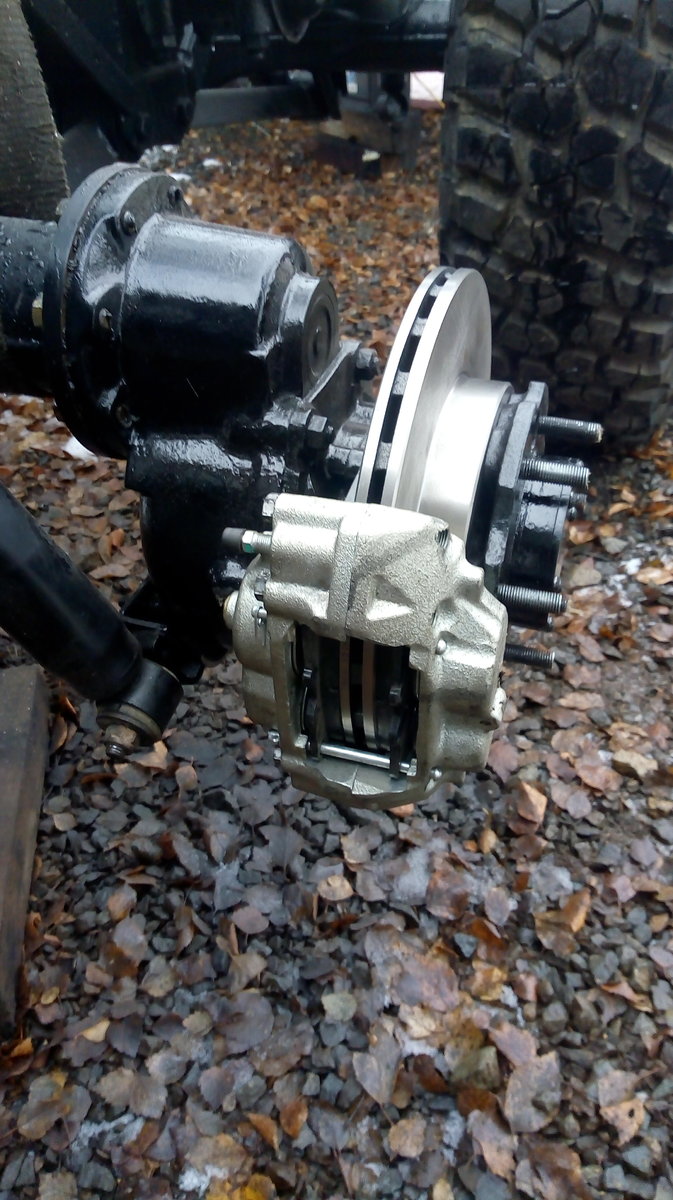
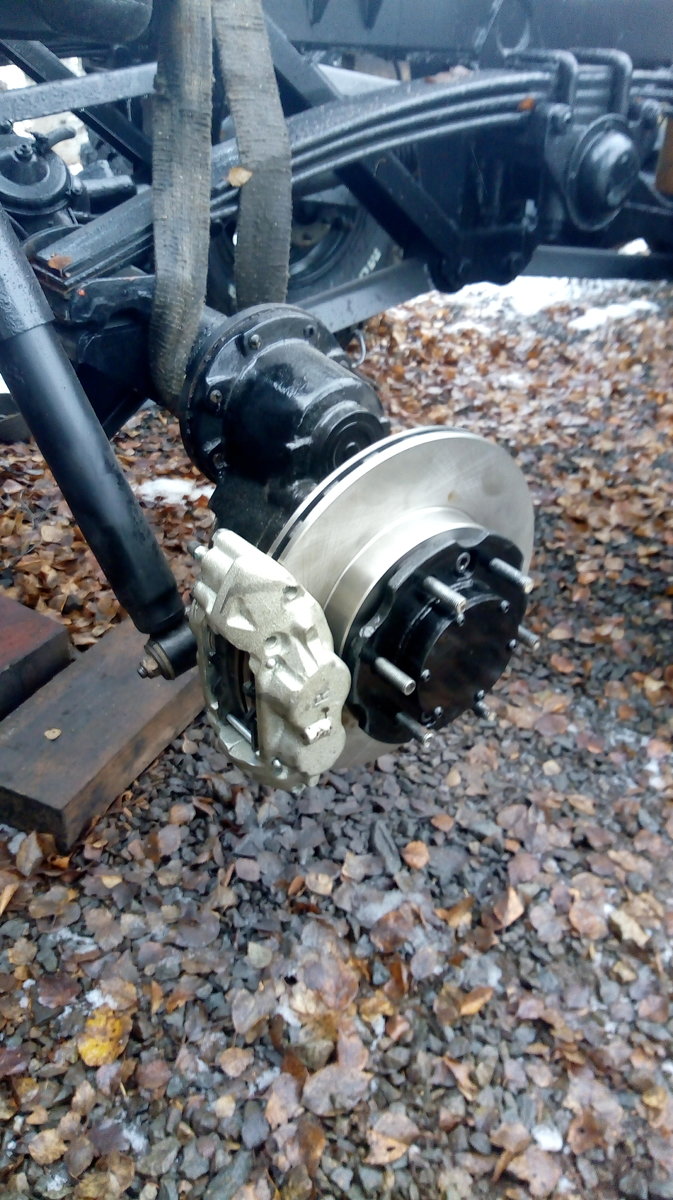
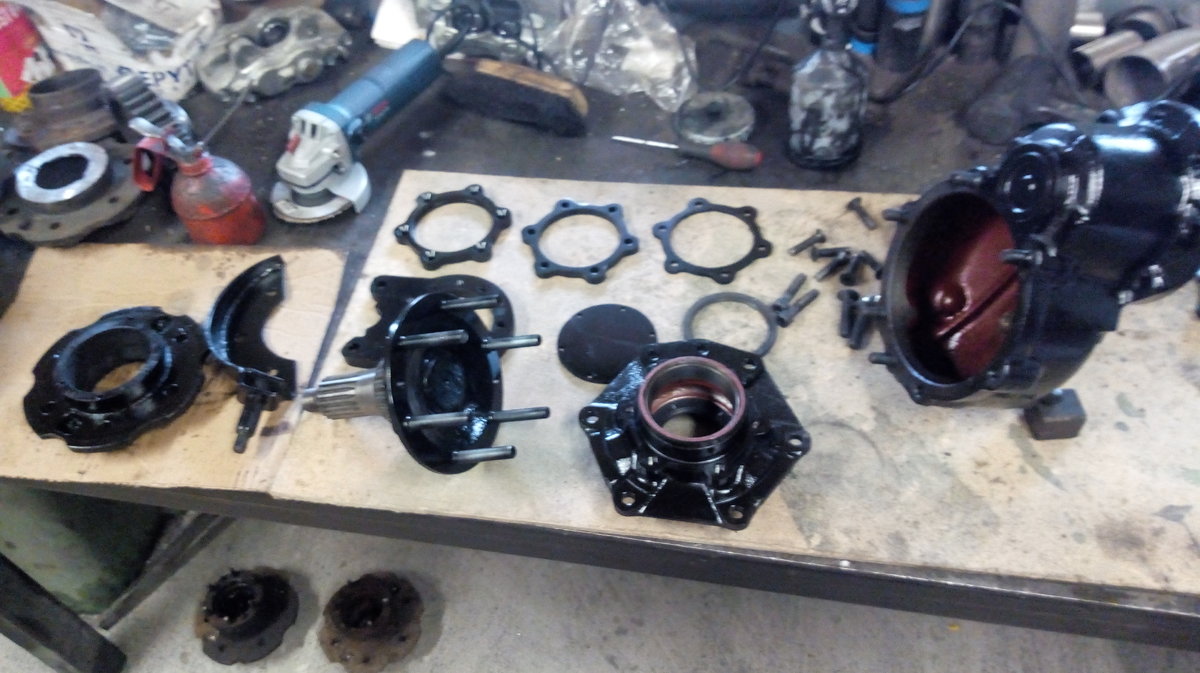
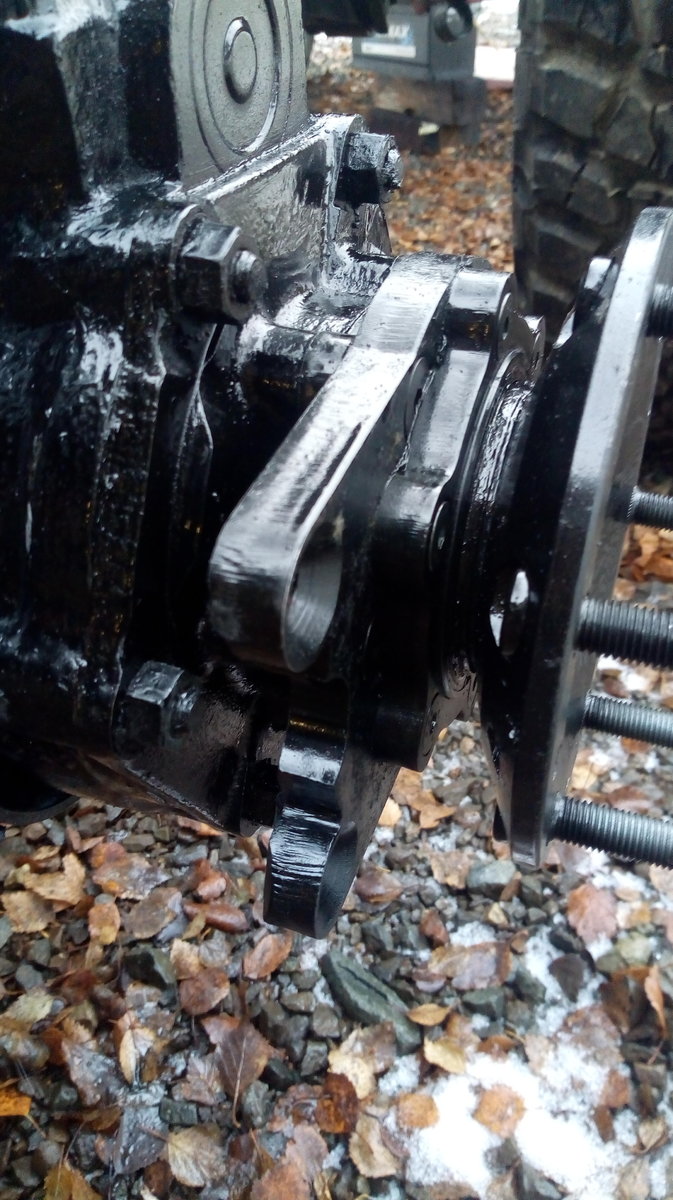
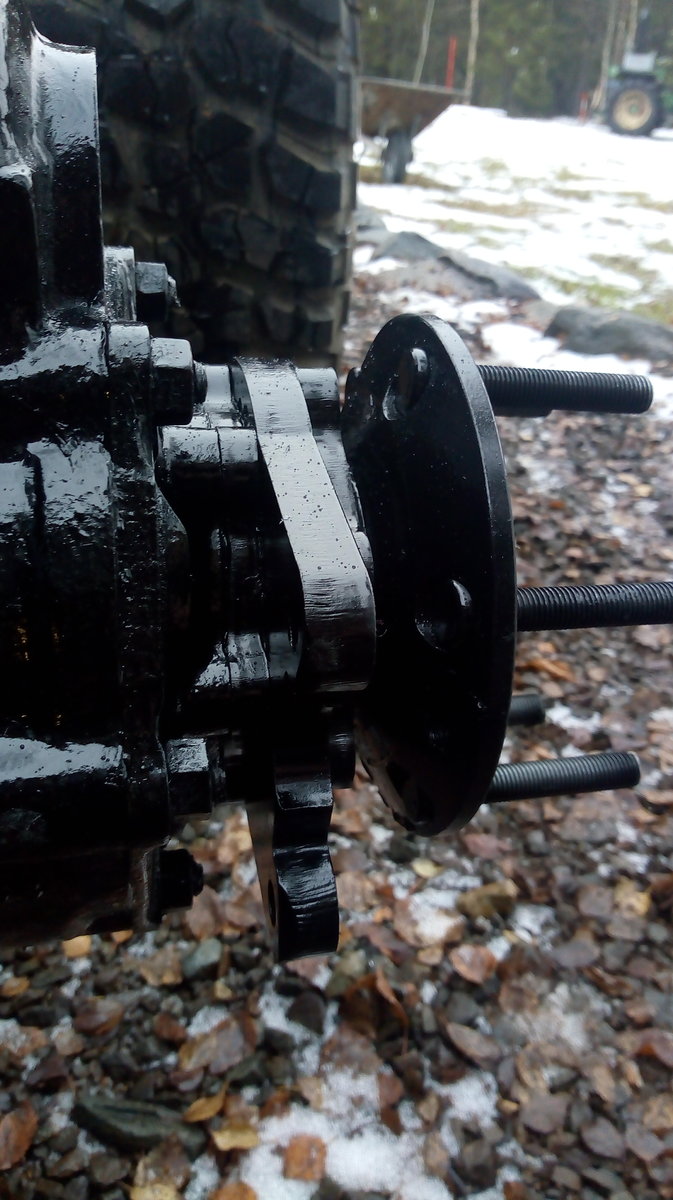
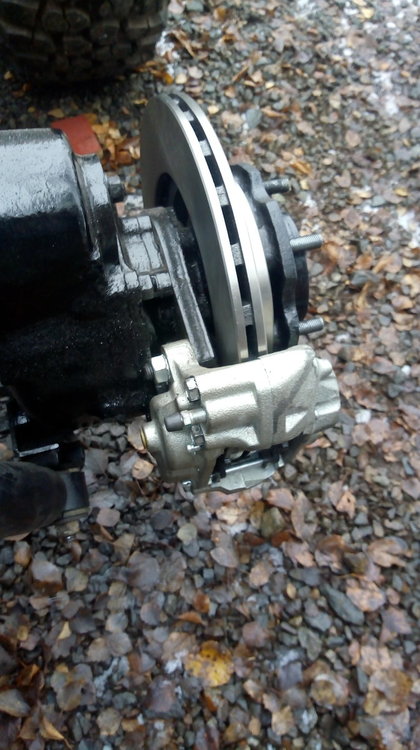
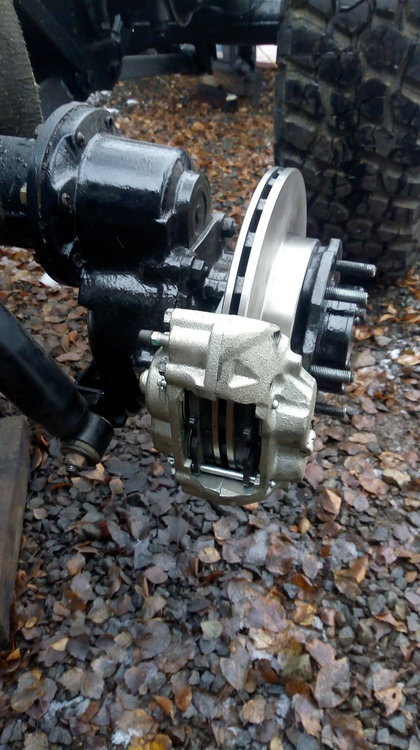
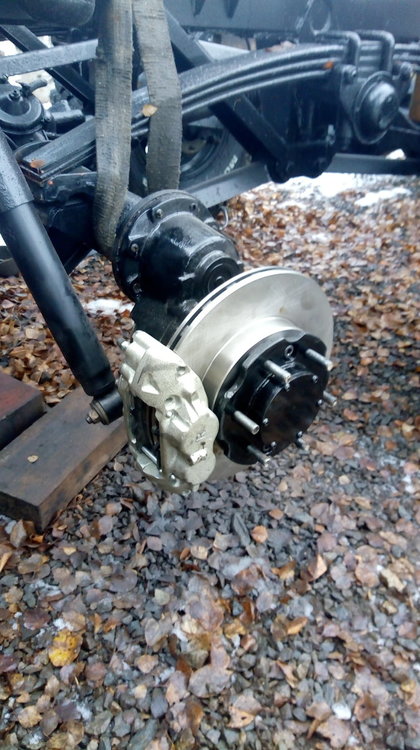
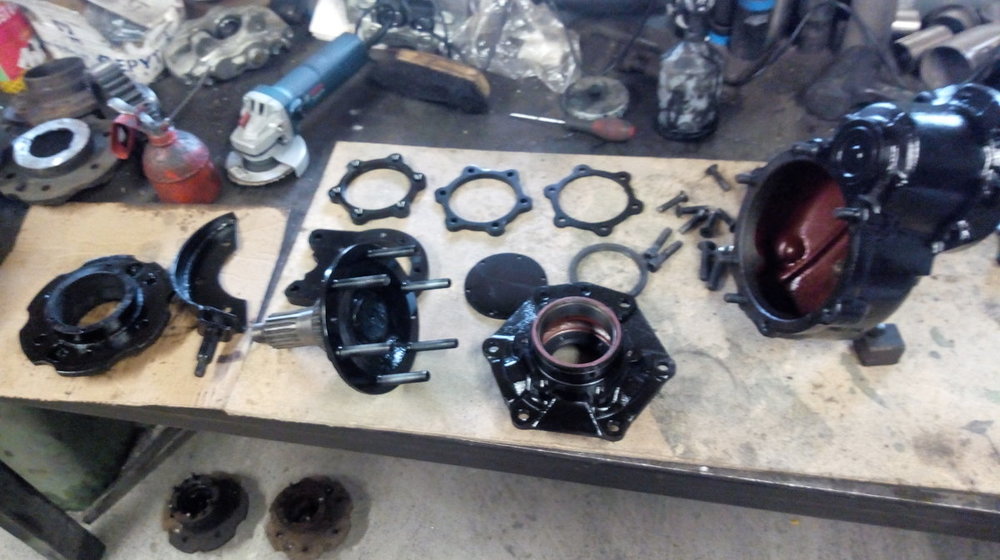
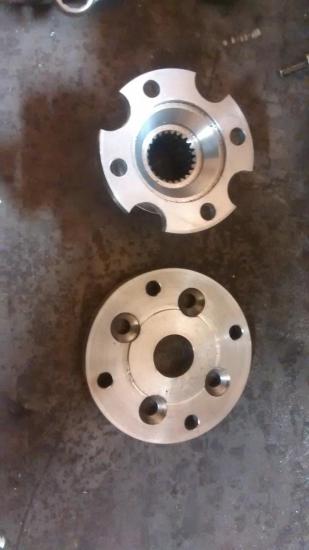
The piece on the outside of the brake disc is the old toyota hub with quite a lot of material taken off it. This is really just a glorified wheel spacer which gives clearance for the wheel, but it also makes everything hub centric ie. it centres the wheel so it doesnt just rely on the wheel studs. The original Volvo hub is centred on the inside of the brake disc, then the toyota hub is centred on the internal diameter of the brake disc. The toyota and volvo hubs are bolted together.
- 42 svar
-
- 6
-

-

-
Some more
- 42 svar
-
- 8
-
-
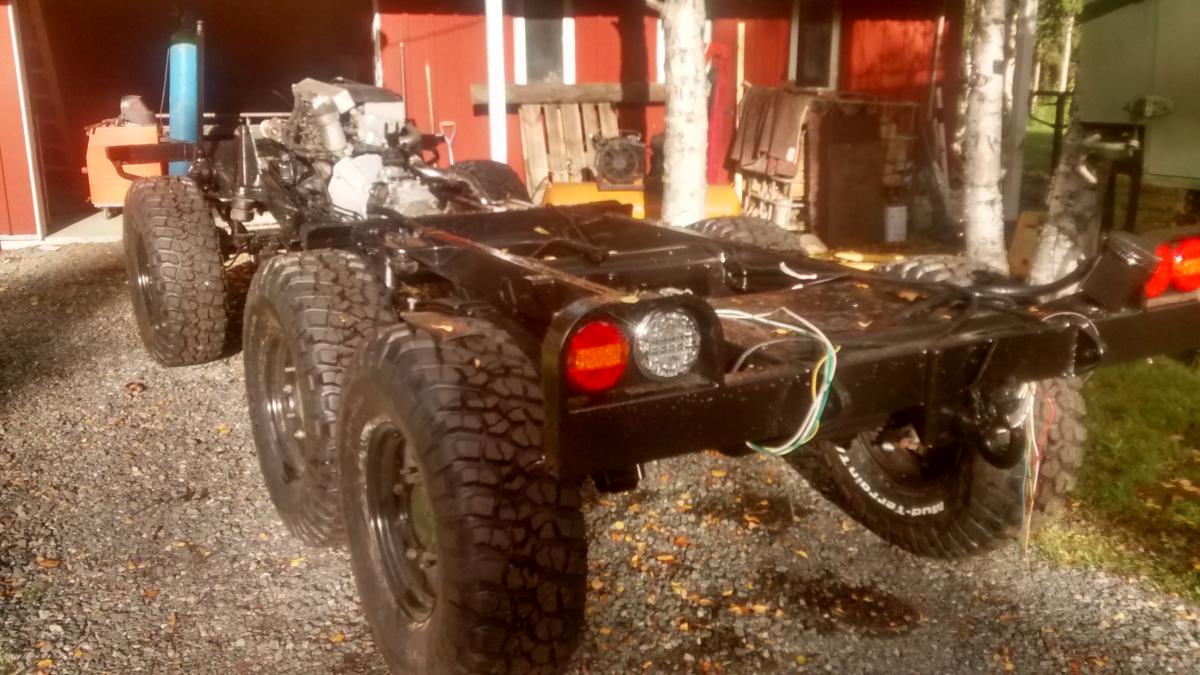
Hello, its a long time since I posted anything, but I have been busy ! Disc brakes - that should be easy, right ....... !?! Ha ha, totally not easy, I have put so many hours into this, I cant even explain it. My aim with the disc conversion was the following : I wanted to use matched discs and calipers from the same vehicle preferably a big 4x4 I didnt want any modifications to the discs or calipers, so I can service in the field with standard parts I wanted standard wheels to fit so if I damage one I can get home I wanted the brackets to fit to the same place the original Volvo brakes attach I wanted to replace the outer oil seal that is really hard to get with a standard off the shelf one. I think I have achieved all of this, the only compromises are : You have to split the caliper to change the brake disc, or strip the portal hub to tighten the bearings I have modified wheels to keep the vehicle width down. Standard Toyota 6 stud wheels fit and you could use them to get you home no problems, but I have moved the centres out on my set. Overall width has increased by 23mm so thats not too bad. All in all very happy, just have to make new pipes and bleed them and then I can test them out. Now for some pics


- 42 svar
-
- 7
-
-
-
Hello, yes there are quite a few updates to this project. Its slow going, but the cab is back on, and the disc conversion is done. I am part way through wiring, and then I am ready for a little test drive and see how it works. I am away now, but when I get back I will take some pics and post them up here.
- 42 svar
-
- 8
-
-
Hej, I am working on my own brake conversion now for my 1314. I dont want to change anything on the original parts apart from drill 5 holes in the original hub and skim the surface less than 1mm to mount the brake disc. In order to achieve this, you need to use a very large brake disc and this means that my solution wont work with the original wheels. This is OK for me as I have changed to 17" wheels in order to get a better choice of tyres. I am using a Landrover Discovery 4 rear disc and brake caliper. The disc is 350mm diameter and I will use rear calipers all round (2 per wheel on the front, 1 per wheel on the back). Time will tell if this is a good solution, but I think it will be good. I dont know if I will have to change the brake master cylinder yet. Based on my experience so far, I think that it would have to be a very expensive kit to make commercial sense. There is a lot work involved to get it right. When I get a bit further with it, I will post up some more info and pics on my engine conversion thread (Probably in a few months - I am not in a rush !)
- 13 svar
-
- 6
-
-
Thanks for your help. I have ordered the valves, I will update this thread when I fit them with some pictures.
- 16 svar
-
- 4
-
-
http://www.ebay.co.uk/itm/1-4-DC-12V-3way-2-position-Pneumatic-Electric-Solenoid-Valve-BSP-Air-Aluminum-/121880914346?hash=item1c60ab29aa:g:IiYAAOSwzhVWreBY The schematic on this one looks like the one on your post ? Thanks for your help
-
http://www.ebay.co.uk/itm/3-Way-2-Position-Pneumatic-Solenoid-Valve-PT1-8-Port-AC220V-110V-DC24V-12V-Y5G5-/222273307066?var=&hash=item33c08581ba:m:m-72hgsUgUGCume-mxAI79g What about this one ? Any better ? Thanks
-
What about this, would this work ? http://www.ebay.co.uk/itm/2-Way-NBR-Electric-Solenoid-Valve-Water-Air-N-O-12V-DC-1-4-Normally-Open-Type-/271888344686?hash=item3f4dcee66e:g:wvEAAOSwbsBXi0PV
-
Can anyone help me with some suggestions for a nice 12V valve setup to operate the vacuum for the difflocks on a TGB1314 ? I want to buy something new so that it is reliable. Any help would be greatly appreciated
-
The disc conversion is only in my head right now ! I will put the standard brakes back on for besiktning and registering, and then work on that over the winter. I will put it up here as I progress with it. If it is any good, I am happy to share it with people. I just like these mercedes OM606/605 engines. They are very reliable, lots of potential for more power if you want it, they sound nice, a little bit more modern, hopefully better on diesel, etc .... The toyota swap would be a much simpler swap. This toyota engine and gearbox I have here would go straight in with not too many problems. The transfer box is all offset the right way. The only thing it doesnt have is a transmission handbrake, but that is easy to sort, in fact I think you can buy one off the shelf in Australia. I will take some more pics next week as the cab goes on. I am putting completely new wiring in, so this will take me a while as I am not too good with electrics.
- 42 svar
-
- 2
-
-
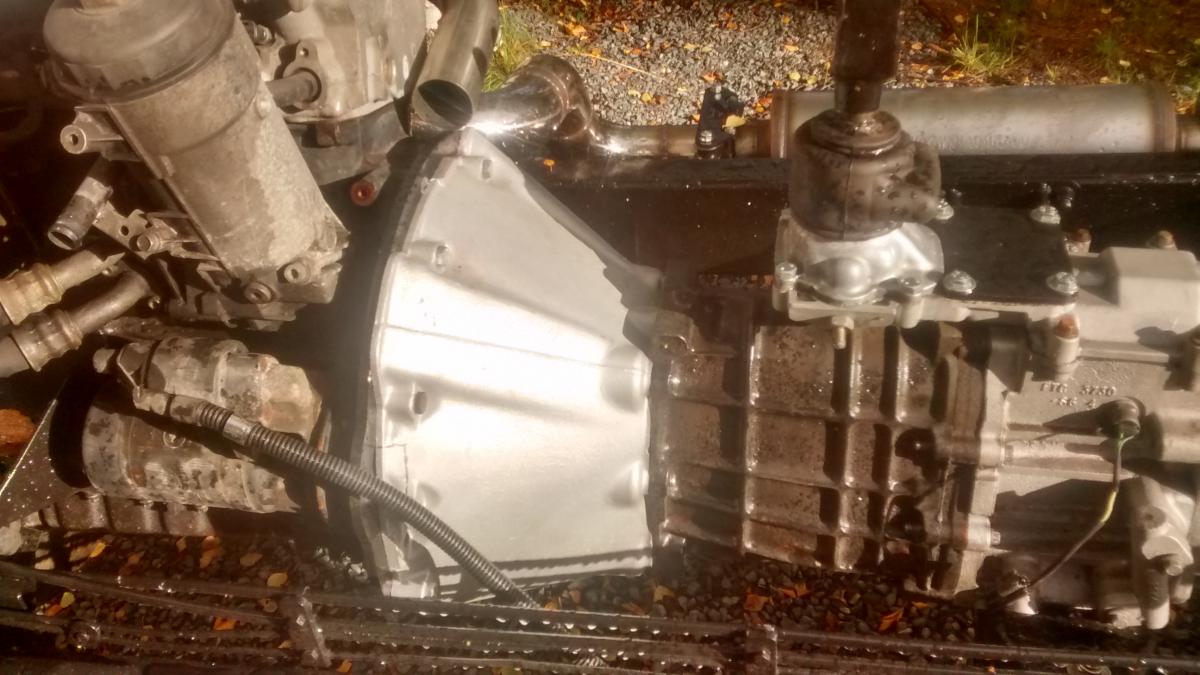
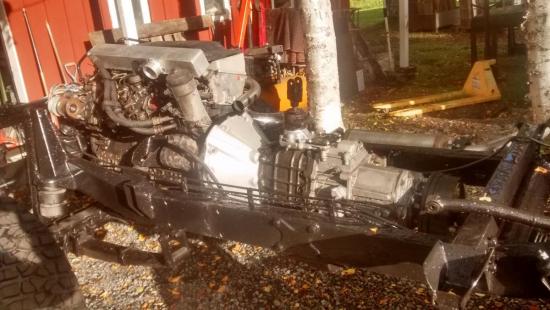
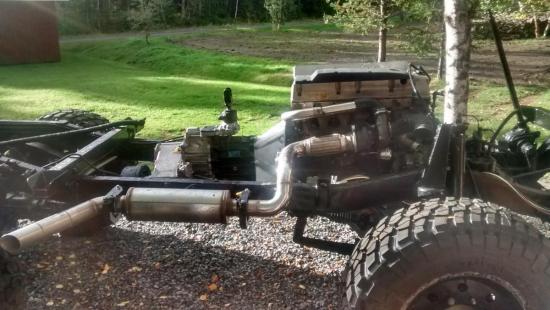
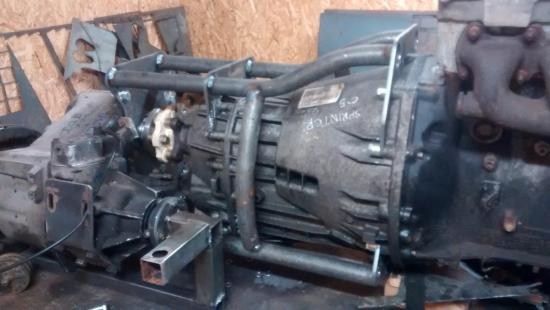
Hello, its been a long time coming, but here is an update ! This project has changed quite a bit. I am now using a landrover R380 gearbox with a short bellhousing from a Rover car. This joins onto the OM606 with a plate from SMT. I have the 0.73 5th gear in the gearbox and 1.003 ratio in the transfer box, so I think that it will be very nice cruising with 37" tryes. It is a very short gearbox/transfer box, so it works well in the chassis. If I was starting again, I think I would take the OM605 engine as it will make plenty of power and would give you a lot more room for everything, but I had a nice OM606 with low kms, so that is what I used. I moved the tubular cross member back about 15cms and I made a bolt in cross member which goes underneath the gearbox with the gearbox mounts. I took out 6cm from the rear propshaft and I have modified the sump on the engine to avoid hitting the axle. It has taken a long time because I stripped the whole chassis down and painted everything before building up. I always end up doing this with my projects, I start by thinking "I will just clean it and put some paint on it" and then I think "Oh well if I am doing this I might as well do it properly and take some parts off" Then suddenly, I have taken the whole vehicle apart into hundreds of pieces and I end up doing a full restoration. At least it is done properly I have nearly finished a lot of little jobs on the engine, and then I am also painting the cabin ready to go back on next week. I built my own 17" wheels and I have 37x12.50x17 BFG tyres, should be nice. I will also make my own disc brake conversion in the winter. I already have the calipers, and I think I may have found a disc which works. It will keep the original bolt pattern for the wheels. The Mercedes gearbox and frame/coupling to LT230 are for sale if anyone is interested, I also have a 4.0l toyota engine and gearbox here which could be used for a conversion, that is for sale too.


- 42 svar
-
- 12
-
-
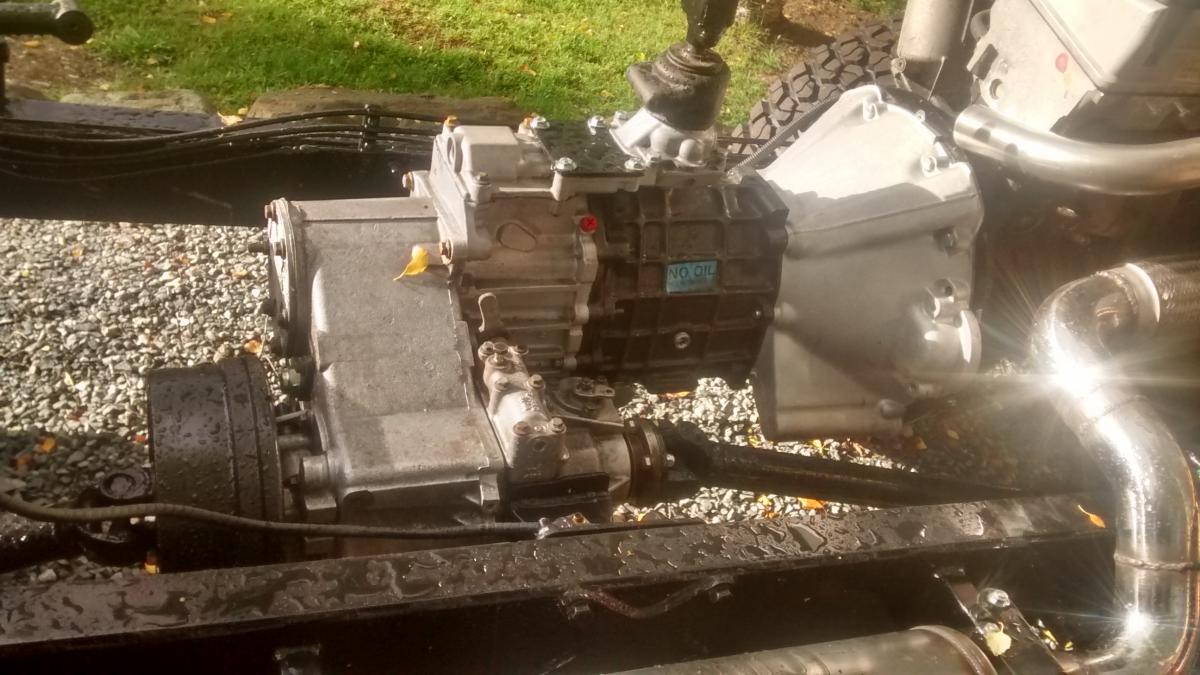
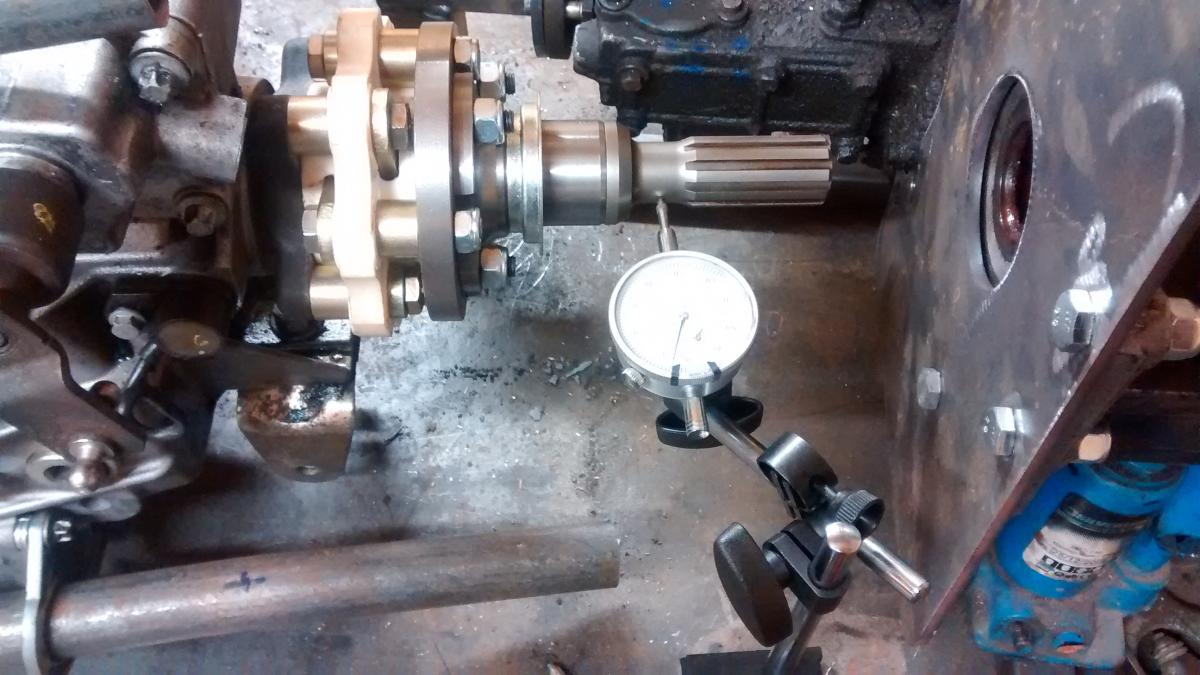
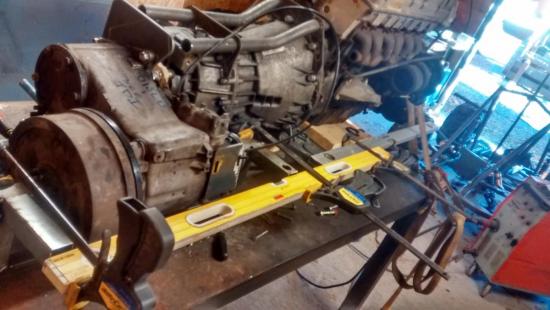
A bit more done. I have taken over three hours making sure everything is straight. The run out on the shaft is 0.015mm which is as good as I can get it. The transfer box is sat totally level with the engine measured with a digital inclinometer. Then I had to make sure that they were inline running in the other plane. The only good reference point is on the engine block where the sump meets the block. I made this very heath robinson jig, and the transfer box is now with 0.5mm of being square this way on. Once I had it like this, I checked the alignment with the flange using feeler gauges between the bolt head and the flange. You measure the same bolt at 90 degree intervals. You can have a maximum of 0.25mm difference and I had just 0.05mm, so quite chuffed with that. Now I know that it is in line. It is a fairly simple job of welding up the tubework which will hold it all together. I want the cradle to be very rigid so that the gearbox and transfer box hang off it. Now I will cut quite a few gussets and plates to add rigidity to it and weld them in. Once I have done this I will take the jig off the transfer box and it should all hang in place. Then I can build the removable cross member and fit it on the bench so that it all sits perfectly level prior to fitting it in the vehicle. This stage has taken far longer than I wanted but it will be worth it down the line.

- 42 svar
-
- 7
-
-
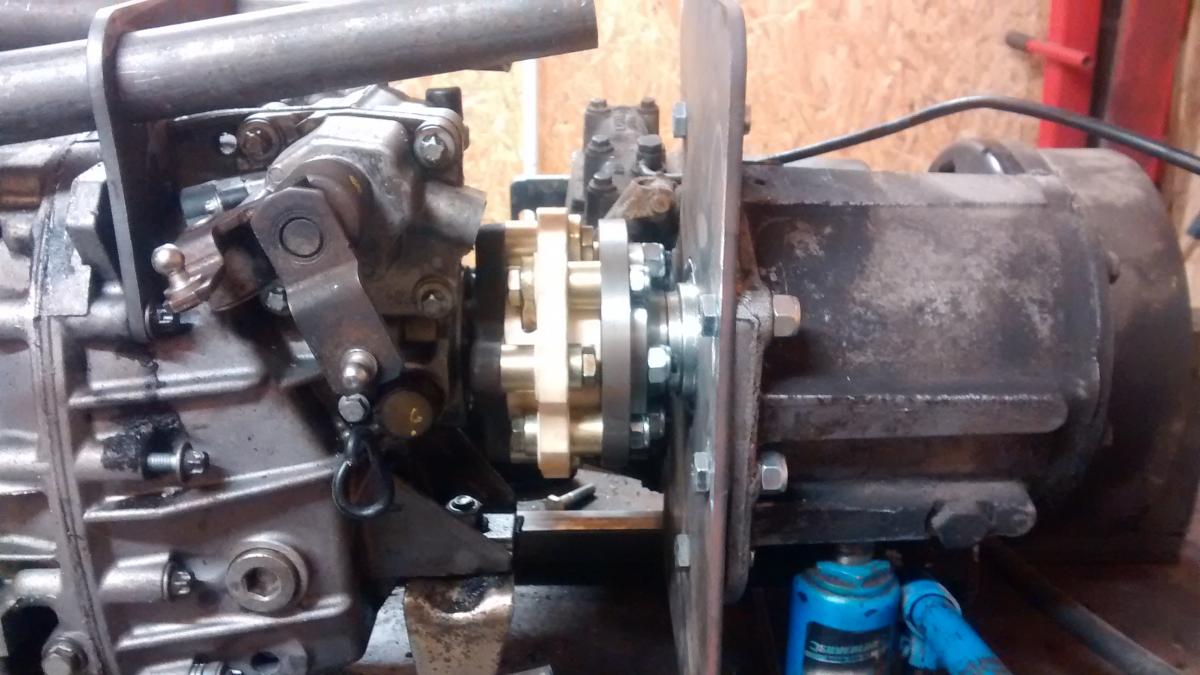
Yes you are right its an R&D coupling. I am very happy with it, it is a very well made thing and you can also check the alignment with feeler guages which I will do prior to welding
-
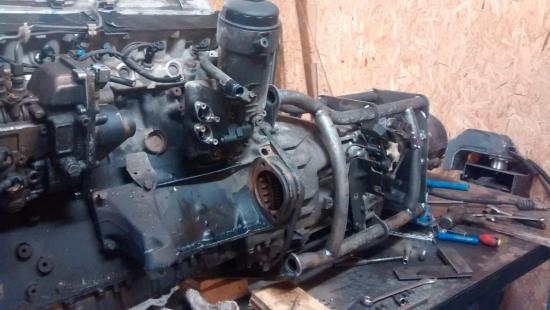
Hello, its been a long while since an update, this is because I was waiting for my coupling. It finally arrive last week, so I have done some work on it today. The coupling bolts straight up to the mercedes gearbox flange, I just had to machine a rebate out of the plastic part. On the other end, there is no way to bolt the coupling up to the input shaft for the transfer box, so I made an adapter to join the two up. This took me ages, mainly because I am not very good at machining, so I have to measure about 1000 times to make sure it is right. I made the adapter ring from scratch and machined the sections out of the input shaft flange so that there is room for all the bolts and nuts. Once I had done this, then I assembled it all and checked the run out with a dial guage. Its not perfect even after taking the whole day making it, but it is very close and well within the tolerances for the coupling. Finally, I slid the transfer box onto the shaft which was very easy, so I can start measuring and trimming the tubes ready for welding. Tomorrow I will build a frame to hold everything perfectly square and then weld the frame up and start re-enforcing it.


- 42 svar
-
- 2
-